
There are moments when testing a new projector that i feel like the industry has something truly significant to share with me. These occasions come usually when projection technology takes a major leap forward, offering us the next generation of products that genuinely enhances our experience as users. Today is one of those moments.
A few years ago, the laser TV market was revolutionized by the introduction of triple (RGB) laser UST projectors. Now, it’s time for standard throw projectors to catch up. You know, the ones we traditionally place on a table or mount on the ceiling. Except for JVC’s excellent but pricey and bulky D-ILA projectors, this segment has seen little innovation for far too long.
To lead this charge, I couldn’t imagine a better team than AWOL Vision’s engineers. It seems that after the tremendous LTV series they somehow did it again. I would dare to say that this time they’ve essentially reinvented the classic home theater projector.
Ladies and gentlemen, in this review, I present to you perhaps the most sophisticated and versatile home theater projector that has ever landed in my living room.
The brand of this projector called Valerion, and its technical background comes from the well-known and pioneering company in the laser TV market, AWOL Vision.
Who is Valerion?
To introduce Valerion properly, I’ll let the company speak for themselves with an excerpt from their website:
“Valerion, a rising star in the projector world, was founded with an extraordinary vision and mission: to bring Hollywood standards to your home. As a fresh and dynamic brand, Valerion is more than just a name — it’s a shining example of where technology meets art, ushering in a new era of home entertainment.
This ambitious vision is powered by a team of industry elites from AWOL Vision — a pioneering organization renowned for its groundbreaking work in visual technology. They have led and contributed to the development of developing revolutionary products delivering unprecedented visual enjoyment to audiences worldwide.”
So Valerion is a newly established company in the industry that under the auspices of AWOL Vision, has apparently been planning for some time now to surprise us with a new series of home theater projectors. A series that aim to become the benchmark in the category from the very beginning, or simply to bring Hollywood standards in our homes, if i use their words!
This new series is called VisionMaster and consists of five models.

In this review, I will be focusing on the mid-range model: the VisionMaster Plus 2, or else, the white one.
Valerion VisionMaster Plus 2
Before we get to the full specifications and features of the Plus 2, I want to show it to you and, and why not, talk about its packaging. Yes, its packaging.

There’s an old saying that you can tell a good day by the morning, and in the case of Valerion, that was obvious as soon as I started unpacking it.
The Plus 2 comes in unique packaging, with a beautiful and practical transportation and protective case inside the classic box.


The quality of this case is truly outstanding — even the handle has a rubber material on the bottom to make it as comfortable as possible to hold.

And now the time has come to introduce you the content of the box. This is the Valerion VisionMaster Plus 2.

Do you remember the phrase from the Valerion: “It’s a shining example of where technology meets art”? I couldn’t agree more.
The materials used look and feel high quality.
As for the design, it’s a cube with small dimensions (260x186x216mm / 10.2×7.3×8.5 inches) and a weight of 7 kg, whose main feature is the nickel grids that give Plus 2 a unique look.
This pioneering design according to Valerion featuring 14 electroplated metal strips, engineered to endure up to 100 kilograms of pressure. This advanced structure delivers superior strength and reliability while maintaining a sleek, modern aesthetic.

At the bottom of the Plus 2, we find two adjustable feet that allow us to level the rear part, as well as a front lifting system that is quite stiff in operation, ensuring that despite its 7 kg weight, the projector will remain at the angle we set.
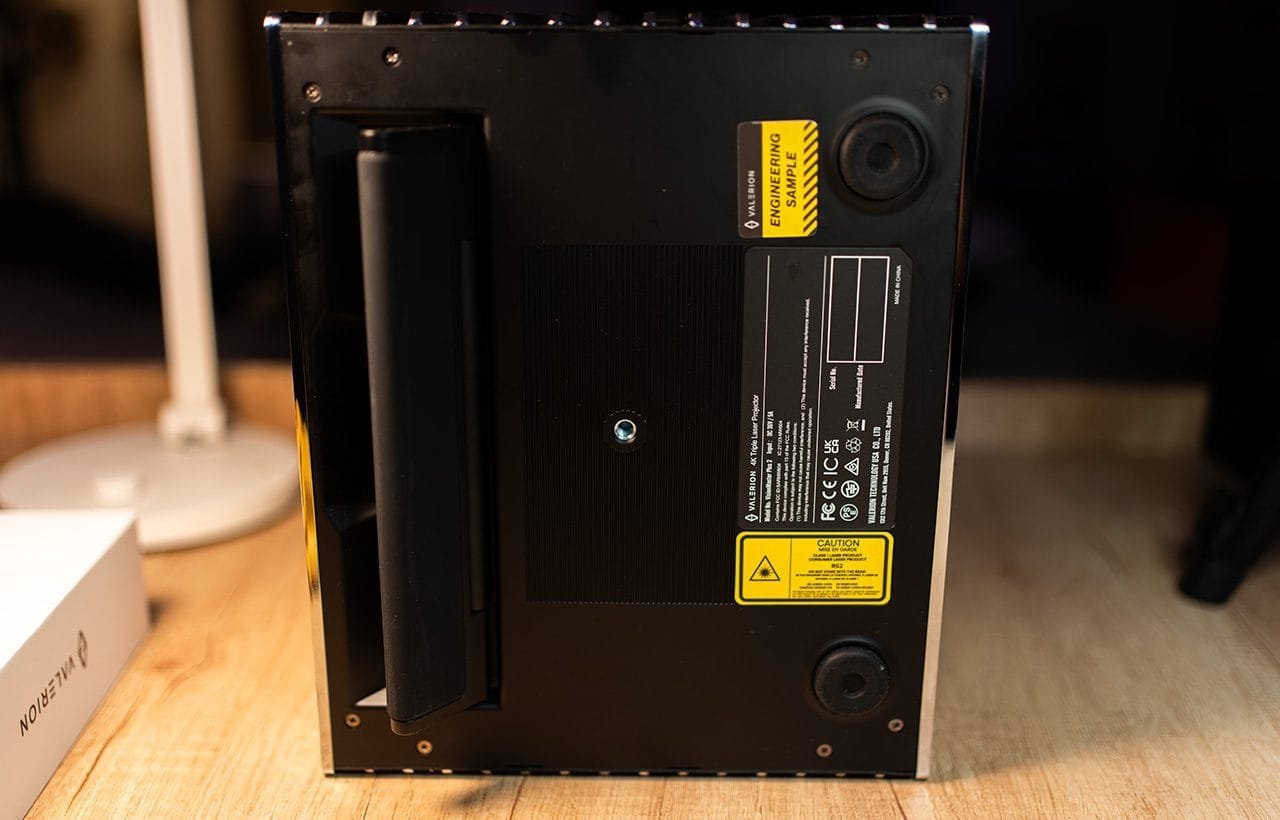
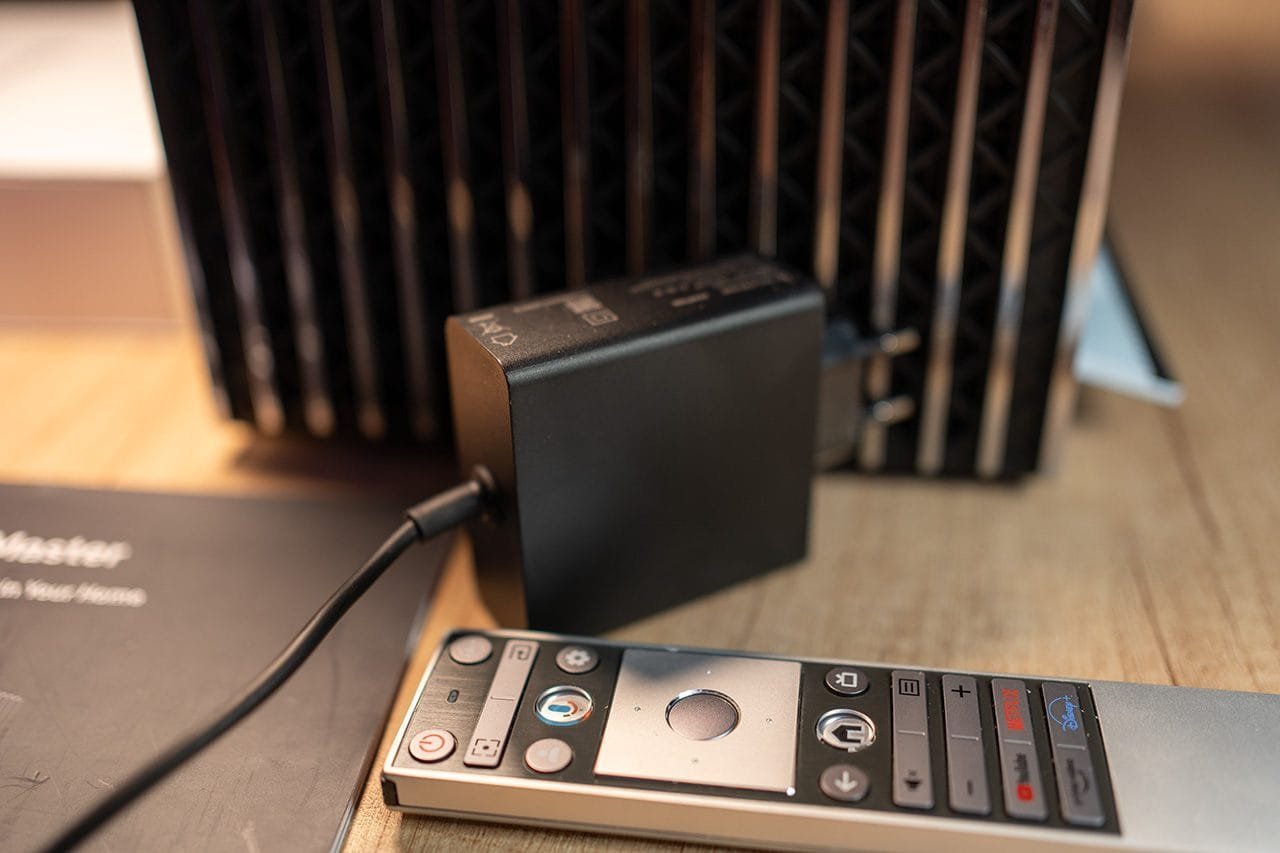
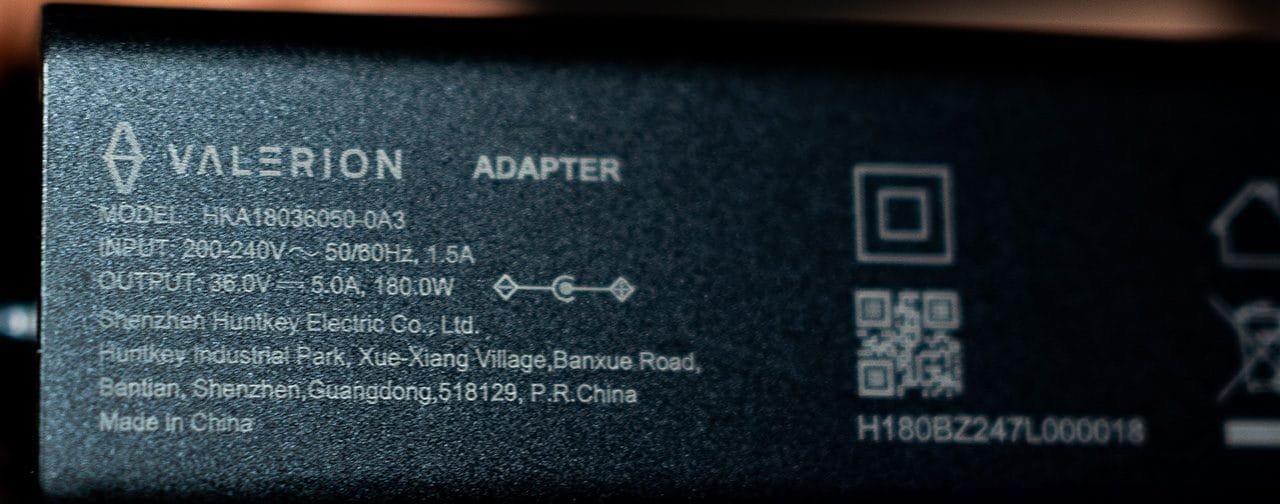
The power supply of the Plus 2 is an external unit, relatively small in size. The fact that the power supply is external, similar to that of a laptop, offers a significant advantage: easy replacement if for any reason (such as a power surge), it fails. This means there’s no need to send the projector in for service, avoiding all the hassle of that process.
The output of the power supply is 36V and 5.0A. If we multiply these values, we find the maximum wattage of the power supply, and thus the maximum power consumption of our projector, which is 180W.
Now for the random useless fact of the day: do you know how many electrons per second pass through the power supply cable to our projector when it draws 5 amps of current? Ready for this? 31.205.000.000.000.000.000. Yep..i know…
Even the remote control of the Plus 2 stands out from anything I’ve used over the years. It’s backlit, exudes a premium feel, and is thoughtfully designed with everything a user could need—including a built-in buzzer and microphone. Naturally, it supports both IR and Bluetooth for seamless connectivity.

This is a shot from the official Valerion VisionMaster Plus 2 manual.

My opinion about this Valerion VisionMaser Plus 2? This is not just another projector guys — it’s a work of art. If Apple ever decided to design and build an RGB laser projector, I’m convinced it would look like this.

The technology behind the Plus 2
The Plus 2 is a DLP projector, and at the heart of its optical engine we found the well-known 0.47-inch chip from Texas Instruments, which in combination with the latest generation XPR module (and completely silent i must admit!) offers a resolution of 3840×2160 (UHD) with a refresh rate of 60 Hz (and 240Hz at 1080p).
The entire optical unit is designed around a compact and revolutionary pure RGB laser light source that allows the Plus 2 to offer an incredible 110% coverage of the BT.2020 (REC.2020) color standard.

At the heart of the Plus 2 we find one of the most advanced smart TV SoCs, the Mediatek Pentonic 700 (MT9618), which I believe is the first time it has been integrated into a laser home theater projector.
This particular SoC features a powerful quad-core processor based on Arm technology, the Cortex-A73, running at 1.4 GHz and an Arm-based GPU, the Mali-G52 MC1. Finally this SoC is equipped with 4 GB DDR4 RAM and 128 GB ROM.
For those who don’t know yet: This is one of the best Smart AV SoCs on the market, with truly impressive capabilities.

The MT9618 contains the MediaTek DLA, an integrated AI processor with remarkable features such as:
- AI-Super Resolution 2.0 with edge smoothing and detail reconstruction
- AI-Picture Quality Scene Recognition 2.0
- AI-Picture Quality Object Recognition 2.5 with depth enhancement
It’s able to process MEMC (the well-known frame interpolation) up to 4K120Hz (Plus 2 is using it only up to 4K60Hz due to DLP technology limitation) and supports the latest generation of video decoding such as AV1, AVS, AVS2, H.264, HEVC (H.265), VVC (H.266) and SHVC.
Plus 2 is compatible with 4K144Hz supporting ALLM, DolbyVision/HDR10+ Gaming and with an input lag of 4ms at 1080p240Hz and 15ms at 4K60Hz, so it can confidently be described as an ideal gaming projector.
Also supports all modern HDR video standards such as HDR10+ and DolbyVision as well as all modern audio standards such as Dolby Atmos, DTS and virtual sound effects like Dolby DAP and DTS:Virtual X.
Connections
In terms of connectivity, the Valerion VisionMaster Plus 2 is equipped with:
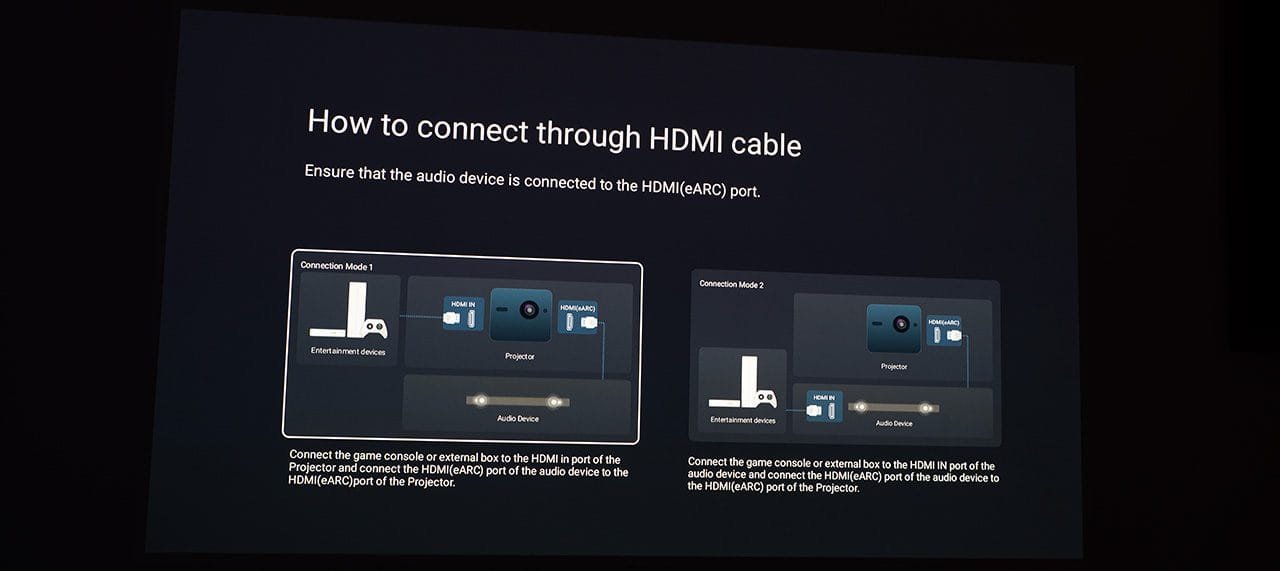
2 HDMI 2.1 ports and 1 HDMI 2.0, one of which also supports next generation ARC, eARC (Enhanced Audio Return Channel).

The eARC can deliver up to 32 channels of audio, including 8 channels streaming uncompressed 24-bit/192kHz audio.
For those unfamiliar with eARC and its purpose, here’s a simple example: you’ve connected your PS5 or simply using your projector’s smart interface to play a game or watch Netflix. The eARC HDMI allows you to send the sound directly and automatically to an amplifier or soundbar without the need for an optical or other audio output as before.

Also by activating CEC on the HDMI inputs, you can also control the volume of the external audio device directly from the Plus 2 remote control.
(I recommend using an Ethernet HDMI cable for the use of eARC to ensure seamless functionality)
Continuing with the input/output ports on the Plus 2, we find two USB ports, one 2.0 and one 3.2 (5Gbps), as well as an optical and analog audio output. Finally there is also a gigabit ethernet port.
In terms of wireless connectivity, the Plus 2 also offers the latest generation of bi-directional Bluetooth 5.2 and WiFi 6E.
Specifications
Valerion announces a brightness of 2.000 ISO lumens and two on/off contrast values for the Plus 2.
3.000:1 native contrast and 10.000:1 “viewing” contrast. We will analyze these contrast values in more detail in the next sections.
The lens throw ratio is fixed at 1.2:1, which means that if we want to open a wide screen of 2 meters (78.7 inches or 6.6 feet) for example, we have to multiply by the projection throw ratio of 1.2, so we have to place the projector at 2.4 meters (94.4 inches or 8 feet) away from the screen (or the wall).
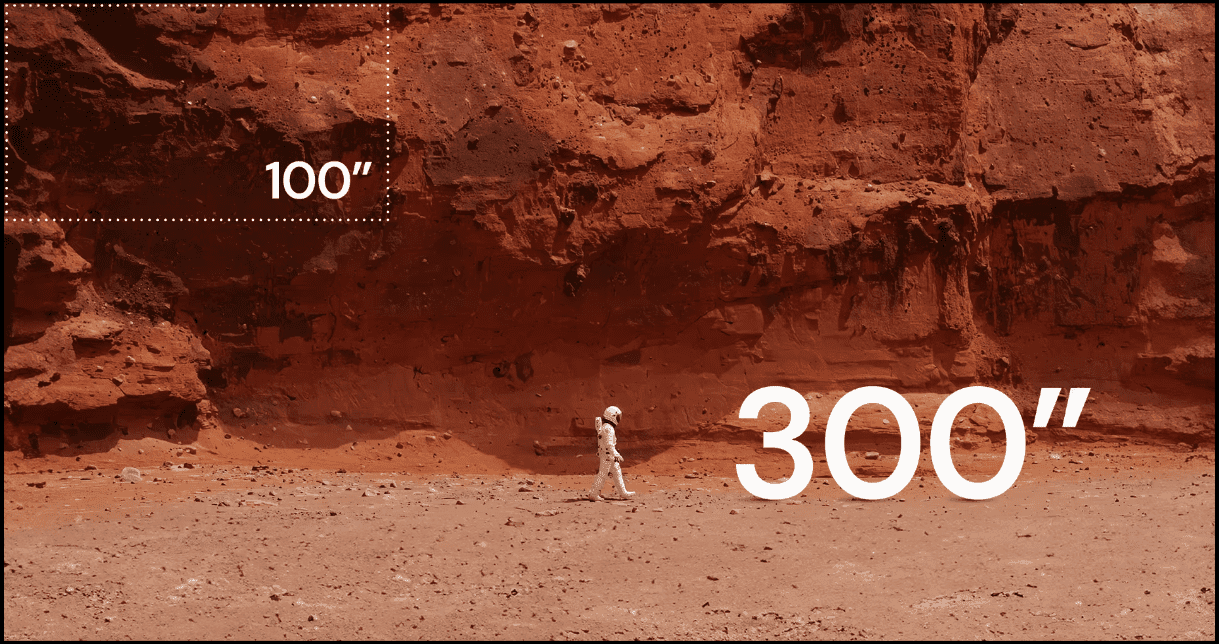
The lens is motorized and has autofocus that can handle screens with a diagonal size of up to 300 inches! Its offset is 100%, that means that the bottom of the projected image starts exactly at the heigh of the lens.
The Plus 2 is fully 3D-capable (requires active DLP Link glasses) and can project all known 3D formats. (As a fan of 3D projection, as you may already know, and as a collector of 3D Blu-ray disks, all I can say is: YEAH!)
I have to mention that the Plus 2 not only supports Dolby Vision, but also IMAX Enhanced (with IMAX Enhanced mode preserves the IMAX 1.9:1 or 1.43:1 aspect ratio) and full supporting of 24FPS & 48FPS movie formats (with no conversion to 60Hz!).
I have saved the integrated sound system for last — yes, it has that too! The Plus 2 has two internal drivers, each with 12 watts of power supporting of course DTS Virtual:X.
The technical specifications and features of the Plus 2 are really impressive, but specs do not usually tell the whole truth — or do they?
Setting up the Valerion VisionMaster Plus 2 – Menu
Setting up and powering on the Plus 2 takes less than a minute. All you need is a blank wall (or a projection screen) and a power source. I tested the Plus 2 on both types of surfaces: a Celexon Dynamic Slate ALR 100″ screen installed in my living room, as well as a white wall opposite my desk, at around 80 inches. I wanted to see how the Plus 2 would perform in both scenarios.
The initial Google TV+ setup process is something I assume you are all familiar with, it requires connecting our Google account (or creating one if we don’t already have), and it takes about 5 minutes, so I’ll skip over it quickly.
At the front of the Plus 2, there are two sensors, Valerion call them CMOS image & ToF sensors.
ToF (Time of Flight camera sensor) sensor is a distance measurement system that measures the distance between the camera and the object at each point of the image. It calculates the time it takes for a light signal, usually from a laser or LED (in our case a laser if i see correctly), to travel to the object and back to the camera.
This is where all the magic happen..

With these sensors, the Plus 2 can:
- Automatically adjust focus
- Automatically adjust keystone & tilt
- Automatically adjust the frame size according to the screen
- Adjust the frame to avoid any obstacles
- Eye protection function
All the image frame correction tools are inside the sub-menu “projector” in the main settings shortcut. Here is how Valerion engineers have design this whole image frame correction menu tree.
At first page you will find all the “manual” adjustments, by saying manual, i mean that the users must be a part of the procedure by choosing the adjustment they want, manual or auto, it does matter.

Auto Keystone Correction: This feature automatically adjusts the image frame based on the projector’s positioning, allowing users to project at an angle. It corrects the image frame according to the projector’s tilt on the vertical & horizontal axis.
Manual Keystone: By selecting this option, the Plus 2 displays a pattern that allows us to manually adjust the four corners of the image frame to achieve the desired correction.

Auto Screen Fit: By choosing the “Auto Screen Fit” option, the Plus 2 automatically adjusts the image frame to fit perfectly on our screen. For instance, if you place the projector at a distance where the image size exceeds your screen, there’s no problem. In just seconds, the Plus 2 will “see and measure” the dimensions of the screen and will adjust the image to match the screen perfectly.
Auto Focus: Pressing the “OK” button on the remote, the Plus 2 performs a fast and accurate auto-focus without needing to project a pattern (unlike many other models i have try in the past). It’s fast, precise, and does the job perfectly. After the auto focus completes, the Plus 2 gives you for 2 seconds the option to press the “OK” button again in order to perform a manual corrections if needed.

Manual Focus: If you prefer, you can manually adjust the focus. Simply use the up and down buttons on the remote to adjust the electronic lens to your preference (there is also a dedicated button on the remote for instant access to focus function).

Display Zoom: With this setting, you can adjust the image size as desired, even shrinking it to a quarter of its original size. I’ve captured this effect with an overexposed image so you can understand perfectly how this feature works .

Position Adjustment: This setting lets you adjust the position of the image, but it only works when keystone correction or digital zoom is applied, as it requires available “space” on the DMD chip to move the image.

Scrolling down we find the “real” auto-correction menu. Here, you can choose whether these corrections should be constantly on or off.

Auto Eye Protection: This feature, familiar from laser TV projectors, ensures safety by detecting when someone passes between the Plus 2 and the projection surface. In such cases, it displays a message and reduces the laser output to protect our eyes if we happen to look directly at the lens. It’s particularly useful for pets and children—though, come on, we’re not supposed to look directly into the lens, right?
Auto Keystone Upon Motion: If this function is selected, every time you move the projector horizontally or vertically, it automatically corrects the image frame without any manual intervention. The Plus 2 performs this function efficiently and quickly without even needing to display a pattern.
Auto Focus Upon Motion: With this feature enabled, the Plus 2 automatically adjusts focus whenever the projector is repositioned, without required any action from the user. The adjustment is both immediate and incredibly precise.
Auto Obstacle Avoidance: This feature does exactly what its name suggests—but it feels almost magical. If there’s an obstacle in the projection area, the Plus 2 uses its sensors to map the obstacle and adjust the image frame accordingly in order to avoid it. The Plus 2 does this so well that it often adjusts the image just millimeters away from the obstacle. Simply amazing.
Auto Screen Fit on Motion: We’ve previously explained how the projector adjusts the image to fit the screen size. Now, this happens automatically when you place the projector in front of the screen, without requiring any user intervention.
Projection Mode: Here, users can select the type of projection—Front, Front Ceiling, Rear, or Rear Ceiling—depending on where they place the Plus 2 in their space.
Auto Fit Flip: When this option is enabled, the projector automatically flips the image based on the installation type, whether it’s a desktop (front) or ceiling mount.
To clarify, the Plus 2 performs all automatic image corrections without requiring projecting a pattern, except when ‘Obstacle Avoidance’ or ‘Auto Screen Fit’ are selected. In these cases, the Plus 2 needs as much light as possible to recognize obstacles or the screen size, so it projects the necessary pattern. The drawback here is that if we have those two auto settings on, every other auto correction (focus, keystone, e.t.c) will use also this pattern and in that case the focus became slower as it seems that the huge amount of light confuse somehow the lens focus sensor.

Generally speaking, it doesn’t matter how you position the Plus 2 in front of the screen, you’ll see a perfect image frame within seconds. I’ve seen this automatic focus and image correction system on a few other models, mostly portables, but here it works much better. It’s almost hard to believe what happens. Focusing is instantaneous, without the constant breathing effect common to other models I’ve tested. It’s as if a human hand is doing it, and an infallible one, because no second adjustment is required.
The whole automatic system works so effortlessly that I had already completed all the tests I wanted to do, and i catch myself still moving the Plus 2 like a child playing with a toy. Take a look..
Before

After

Of course, there are times when you need to manually complete the image frame correction, especially when you challenge the Plus 2 with difficult tasks in complex environments, as I did.
Even more important and quite impressive is the image scaling that the Plus 2 performs when projecting at an angle in a digitally corrected frame. As you can imagine, a digital corrected image frame at an angle projection, means that one side of the frame has fewer pixels than the other. The total number of pixels in the image also decreases as the image does not use the whole DMD chip surface (and pixels of course).
In that case, the Plus 2’s image processor performs the necessary scaling of the image to correct this uneven pixel distribution. Normally in such cases there is a certain loss of image sharpening and some possibly artifacts appears, which is why we usually try to avoid digital correction as much as possible.
Valerion has truly reinvented the digital image correction. I don’t know how they did it, but after hours of watching 4K clips and test patterns, it’s clear that losing image quality due to digital corrections is simply not an issue on this “evil” little cube. The only time your eyes might notice that ‘something’s up here’ is when there’s a panning shot in the scene featuring many vertical or horizontal lines. In those cases, as expected, the scaling done by the Plus 2 is quite visible.
Take a look, even the text is perfect, nothing betrayed that this image has tilt, keystone and digital zoom correction!

It’s the first time I’ve felt that this whole automatic/manual image correction system is working as an absolutely useful feature. I give this automation system a 9/10 rating – it’s the best implementation I’ve seen to date.
At the end of this menu section we find four more adjustments

3D Mode: This can only be enabled when the Plus 2 is fed with 3D content.
DLP Turbo Mode: This mode is designed to reduce input lag to the absolute minimum, gamers will appreciate that feature.
High Altitude Mode: This mode is designed for use in high-altitude environments where the air is thinner. Activating it increases the speed of the cooling fans to ensure effective cooling.
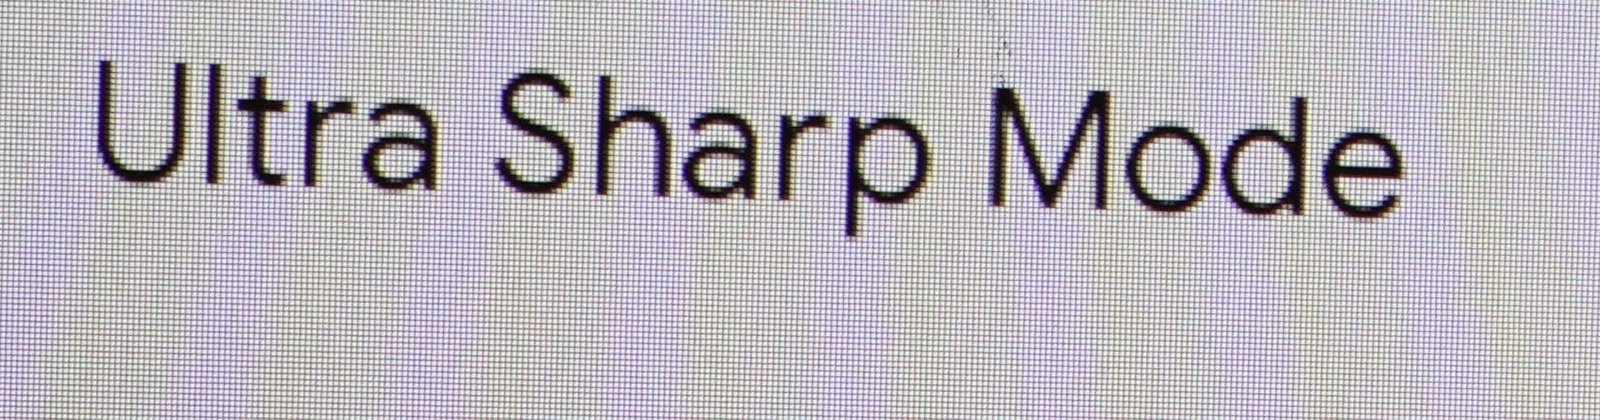
Ultra Sharp Mode: Valerion’s name for the XPR module responsible for delivering the 8.3 million pixels of 4K resolution. Like the AWOL Vision UST projectors, this feature can be enabled or disabled, allowing the Plus 2 to function either as a pure 1080p projector or a pixel-shifted 4K projector. This is particularly useful for achieving 1:1 pixel mapping when watching 1080p content. Cool feature, as it ensures optimal sharpness and accuracy for Full HD content. Here is the difference.
Ultra Sharp Mode off (pure 1080p)
Ultra Sharp Mode on (shifted 4K)

Smart interface
The Valerion VisionMaster Plus 2 features one of the most comprehensive built-in smart interfaces I have ever experienced in a home theater projector.
It comes with official Google TV+, with every possible smart home feature like Airplay 2, Chromecast & Miracast wireless streaming, works also with Google Home, Apple HomeKit, Control 4 and is also compatible with Amazon Alexa.


All the popular streaming apps, including Netflix, Amazon Prime, Disney+, and others, come pre-installed. Additionally, you have the flexibility to add any other apps you prefer. There’s also a built-in browser, allowing you to surf the internet whenever you like.
Moreover, it is equipped with a media server, enabling easy management and playback of content stored either on its internal storage or from an external hard drive or USB stick connected to its USB ports.
I tested the Plus 2 Media Center by connecting a USB stick with a variety of content. The Plus 2 Media Center handled everything flawlessly, including high bitrate TS files that my other media boxes struggle with. What really impressed me was not only the ability to play the files, but also the responsiveness when fast-forwarding and rewinding. It was shockingly fast — no artifacts, no freezing and no lingering.

Ok Nikos, many devices run Google TV, so what’s the difference here, and why are you talking about it as if it’s something special?
The version installed on the Plus 2 is by far the most complete and well structured in terms of settings, features and applications. Speed too, most of us have navigated a Google TV smart user interface at some point, either on our TV, an Android box or even a projector with it pre-installed, so you know exactly what I am talking about.
On the Plus 2, there’s not the slightest hint of lag, you navigate through the Google TV environment instantly, with no stuttering or delays. Apps launch instantly and close quickly, and overall the whole user experience is lightning fast!
Additionally, if you navigate through the system settings, you’ll find some great features like Ambient Mode (which I personally love) for example. This feature allows you to transform the Plus 2 into an elegant digital photo frame.


I almost forgot, if the Plus 2 remains connected to the power supply, it stays in a sleep mode with Google TV preloaded. This means that from the moment we press the power button on the remote, it takes only 8 seconds for the projector to be fully powered and ready to use. However, if we disconnect the Plus 2 from the power supply and then reconnect it, it takes about 42 seconds to load Google TV and become ready for use. If you hold down the power button then you have the choice to restart the Plus 2 or shut it off.
Exploring the Plus 2 Menus and Features
From the moment I started exploring the Plus 2 settings, one thing was clear: the engineers behind this project truly knew what they were doing. There are two main menu sections, one for the projector itself and its placement (which we covered in the previous paragraphs), and another for image settings. Let’s dive into the image settings in detail, as the Plus 2’s approach to image adjustments is quite interesting.
There is a shortcut when we press the settings button on the remote that we can dive directly to picture settings.

First choice here is the factory “Picture Modes” we can use.

Here, we can choose from various pre-configured modes by Valerion, which naturally differ depending on the content we’re watching.
For SDR content, the available modes are: Dynamic, Standard, Sports, PC/Game, Energy Saving, Cinema, and Filmmaker Mode.
For HDR content, the available modes are: HDR Dynamic, HDR Standard, HDR Energy, HDR Sports, HDR Cinema, Filmmaker Mode, and IMAX Mode.
For Dolby Vision content, the available modes are: Dolby Vision Bright, Dolby Vision Dark, and Dolby Vision Custom.
Each of these modes comes pre-configured by Valerion so that we don’t need to master the art of calibration to view the image that suits our preference or matches the content we’re displaying.
I should point out a particularly positive feature of the menu design. When you select an option to experiment with, it opens in a small window at the bottom of the screen, ensuring it doesn’t obstruct your view while adjusting it, this way, you can clearly see how each change affects the final image.
Additionally, you can scroll up and down through the other submenu options, also within this small window at the bottom edge of the screen. The menu remains open indefinitely until you close it manually, with no time limit. I really like this design, well done Valerion!

Below the Picture modes, there is the Apply Picture Setting submenu, where we can choose between two options.
– Current Source if we want the changes to apply only to the specific source (e.g, the particular HDMI input we’re currently using).
– All Sources if we want the changes to apply to all sources.
Right below that, we find the ‘General‘ submenu.

Here we have two unique settings.
– Content Type Auto Detection: By selecting ‘on’, the Plus 2 will automatically recognize Filmmaker Mode or IMAX Mode tags in the content and apply the optimal settings.
– A.I Scene: Here, we can enable the A.I. (Artificial Intelligence) to analyze and adjust all image parameters ideally for each individual scene. This can be selected for both SDR and HDR content, but not for Dolby Vision, where parameters are already “preconfigured” by the metadata of the content.
Next, we find one of the most important submenus tab, the Laser Luminance. This submenu houses several essential settings that significantly impact the image quality.

In order, we have:
– Laser Luminance Level: with a scale from 0 to 10, this setting allows us to adjust the power of the RGB laser engine, directly affecting the overall brightness performance of the Plus 2. I know you’re eager for specific numbers and you’ll find them if you continue reading this review. For now, though, I’ll share two screenshots so you can see the difference with your own eyes. The correct exposure is set at the maximum laser power (10).


– Enhanced Black Level: This is perhaps the most important feature on the Plus 2 — this is where all the magic happens. When activated, a special algorithm adjust on the fly frame by frame various parameters such as the power of the laser engine, the gamma curve and the RGB levels for each IRE of the grayscale. The result is an significant increase in on/off contrast by lowering the black level generated by the Plus 2 and boost the highlights. We will see how this works with more details in the following lines.
– Contrast: The familiar control that can be used to adjust the brightness level of white.
– Black Level: This feature is what the “brightness control” should have been called all along, as it specifically adjusts the black levels. Valerion has taken this step, but with a slightly different approach. It lowers or increases the black level without affecting the overall brightness of the scene, unlike traditional brightness controls.
– Dark Detail: The Plus 2 analyzes the luminance levels of a scene in real time and dynamically enhancing accordingly the dark areas to reveal more detail. This feature works exceptionally well making shadowy parts of the image clearer and more defined.
– Gamma: Here we can adjust the gamma correction with values between 2.0 and 2.4 as well as BT1886 (!), which I personally prefer because it offers more contrast in bright and better detail in dark scenes.

– Active Contrast: Another excellent algorithm by Valerion that deals with the dynamic range of the image. When activated, it offers three different settings: Low, Medium and High. These three settings work a little differently and are not as linear as their names suggest. The “Low” setting generally increases the overall brightness of the scene without affecting the highlights. The “Medium” setting boosts the highlights while reducing the midtones, increasing the perceived contrast of the scene. At the “High” setting, the highlights are boosted just like at the “Medium” setting, but the midtones and dark areas are further reduced, significantly increasing the perceived contrast (with a slight loss of dark detail). This control works very well and allows us to find a contrast balance in scenes that suits our preferences and space.
– Brightness Enhancement: This setting is designed to boost the brightness of the Plus 2, but in practice, its impact is minimal. There are two options—Low and High—but the actual increase in brightness is only around 5% on Low and about 10% on High, and even then, it introduces a slight greenish tint. I wouldn’t recommend using this feature.
– HDR Enhancer: The last parameter in the Laser Luminance section, and my favorite! (Okay, have I really reached the point of having a favorite setting? I become finally a real projector junkie…). With this tool, the Plus 2 gives an HDR-like feel to SDR content through a well-planned boost in color and contrast, and guess what, it works! There is nothing better watching your favorite 1080p movie HDR Enhanced by the Valerion algorithm, it is a whole new experience. When we play HDR content instead of SDR content, this control is transforming to:
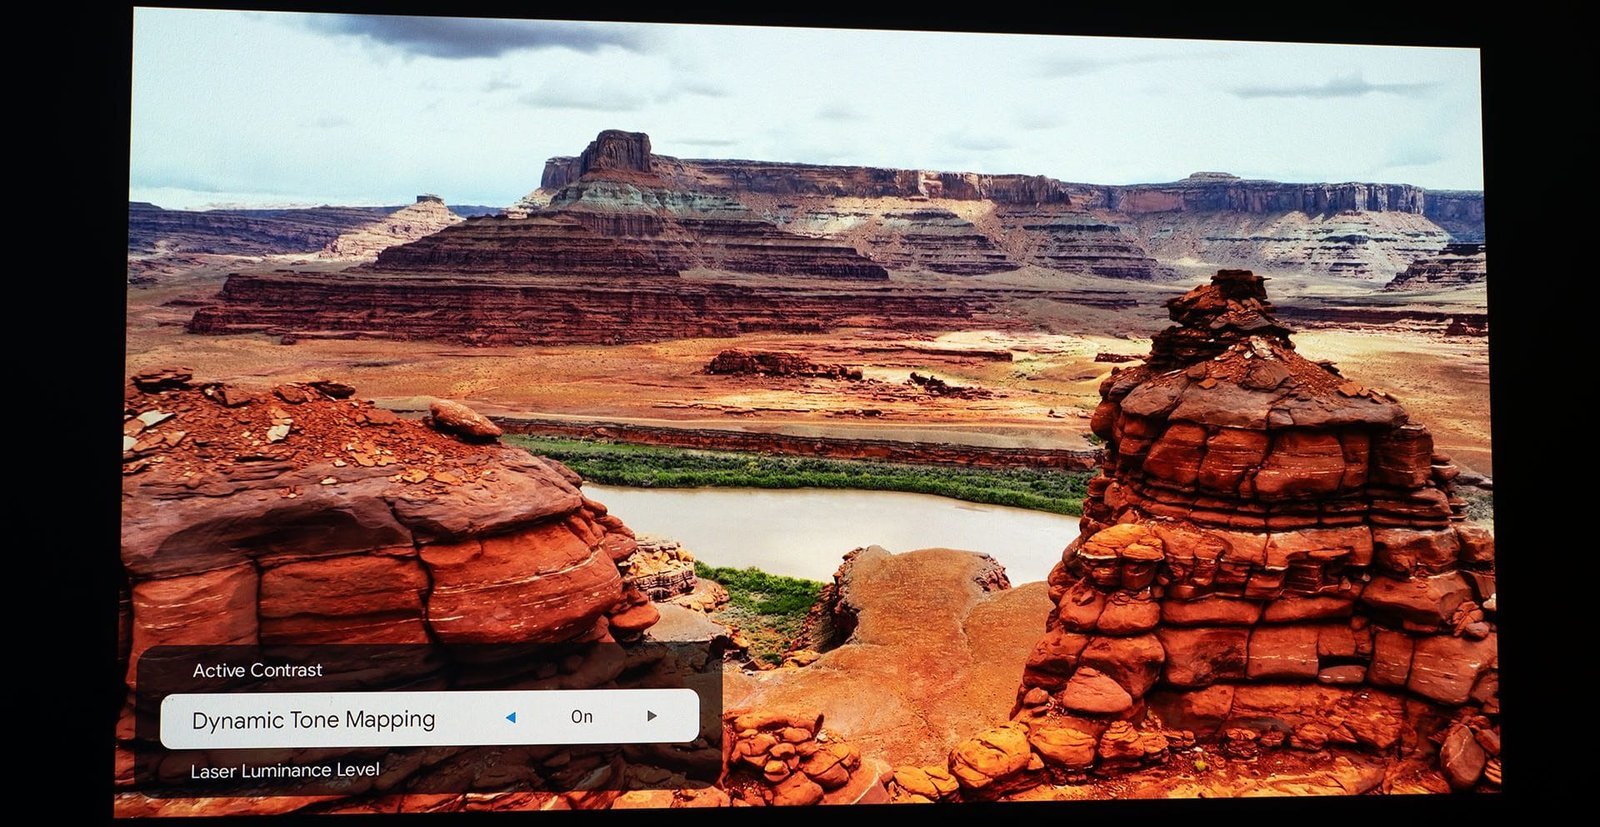
– Dynamic Tone Mapping: Here we have a unique image tool, and I have to give credit to the Valerion engineer behind this development. Tone Mapping is specifically for HDR content (Dolby Vision, as I mentioned earlier, manages itself without external adjustments), and it works flawlessly. It analyzes the brightness levels of HDR content and adjusts them to best match the Plus 2’s capabilities. The result is remarkable, highlights are properly adjusted, revealing previously hidden details and color gradients are smoothed to such an extent that it only takes a few seconds to appreciate the benefits of this algorithm. It’s challenging to capture its full impact with my camera, but even a simple full compressed screenshot shows a striking and eye-catching difference, especially when you look closely at details in the clouds and the mountains .


Color is the submenu tab that we meet in next section. We can do some basic color adjustments here, but not a full color calibration. Let me inform you about it.

– Color & Hue: These settings allow general adjustments of color brightness, saturation and hue. We usually avoid changing these settings because they apply to all colors together, not individually, and the results are often not consistent or linear.
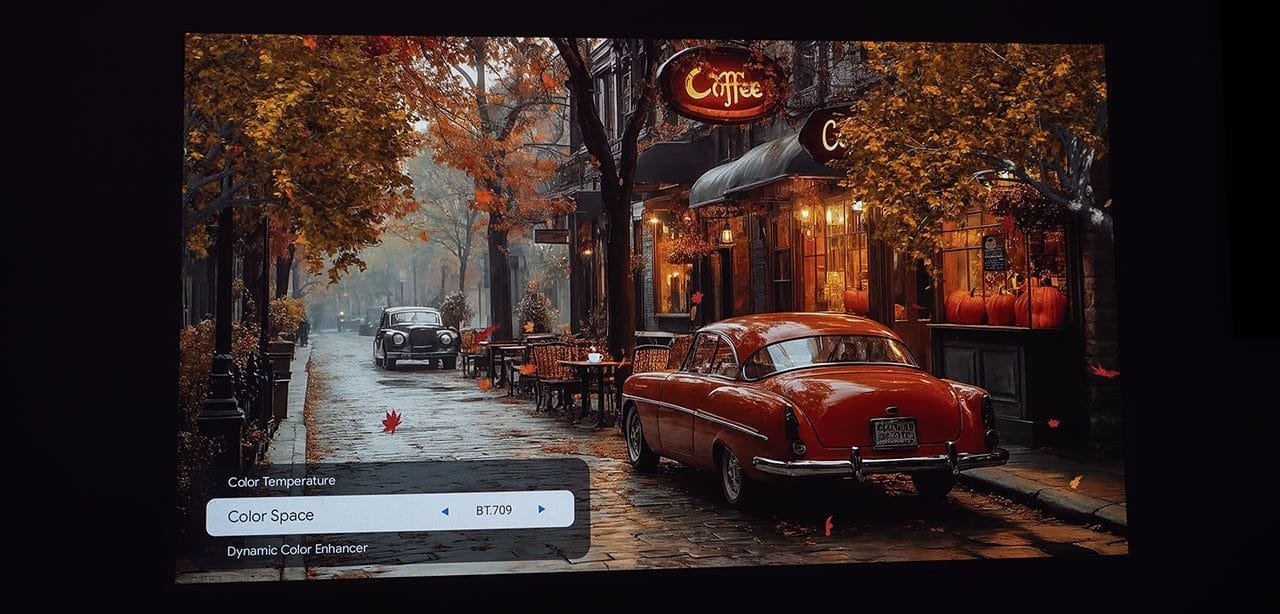
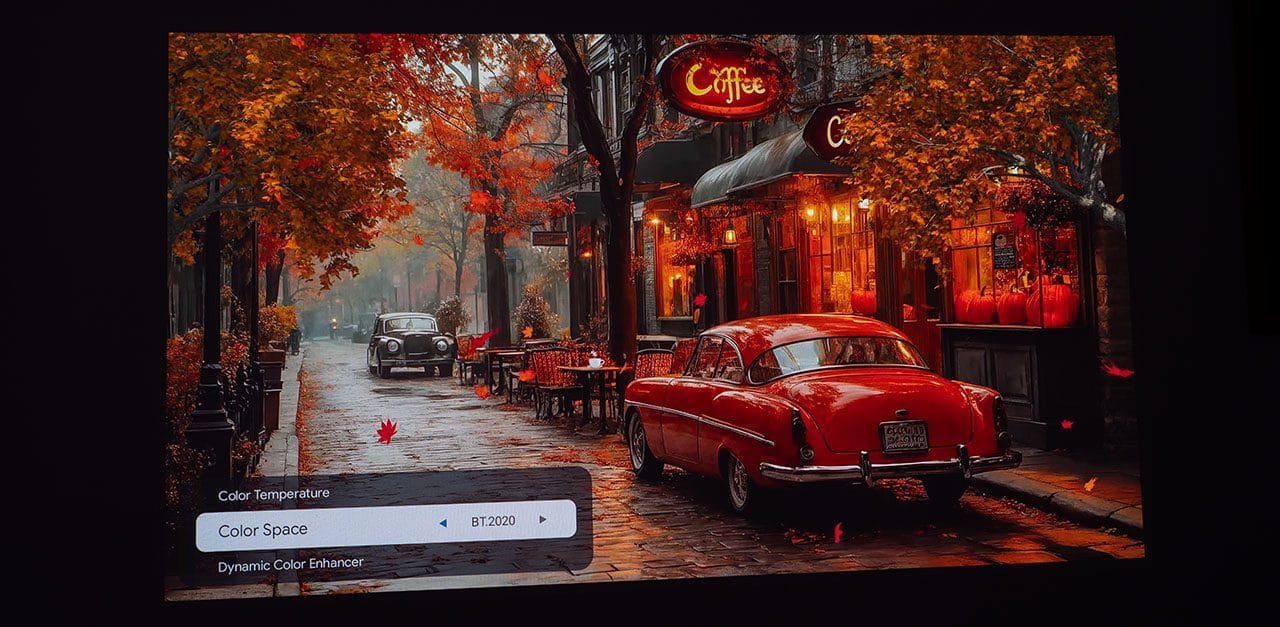
– Color Temperature: This setting doesn’t actually belong to the “Color” tab, as it’s not directly related to colors. Instead, it adjusts only the white temperature (essentially the whole gray scale from black to 100% white). We can choose between these values : Warm 1, Warm 2, Standard and Cool.
– Color Space: It’s great that Valerion has included this setting allowing users to choose their preferred color space. The Plus 2 supports three color spaces: BT.709 (REC.709), DCI-P3 and BT.2020 (REC.2020). You can select any of these color spaces at any time, except when playing Dolby Vision content, which is appropriately locked to BT.2020.
– Dynamic Color Enhancer: This is yet another impressive algorithm from Valerion, allowing the Plus 2 to dynamically adjust colors scene by scene based on the content being projected. It has three levels of intervention: Low, Medium, and Max.
An interesting section of the picture settings is the next one, the Clarity. Valerion really goes all out in this section, providing us with numerous tools to enhance our viewing experience by improving the image clarity in various ways.

– Sharpness: This is the classic sharpness tool that enhances the edges of objects, resulting in a crisper and more defined overall image.
– Smooth Gradient: This setting addresses banding noise by smoothing out transitions in flat gradient areas, creating a more seamless and natural look. You can adjust the effect by choosing between low, medium, and high levels.
– Super Resolution: This AI-powered feature of the Plus 2 enhances image quality by smoothing edges while simultaneously boosting sharpness and detail in real time.
– Noise Reduction: This tool effectively reduces random digital noise in the image, improving overall picture quality. It’s especially useful for films where digital noise is more noticeable than it should be.
– MPEG Noise Reduction: This setting reduces MPEG block noise, particularly in low-quality SDR content. It’s best avoided for high-resolution, high-bitrate content, as it may unnecessarily soften the image.
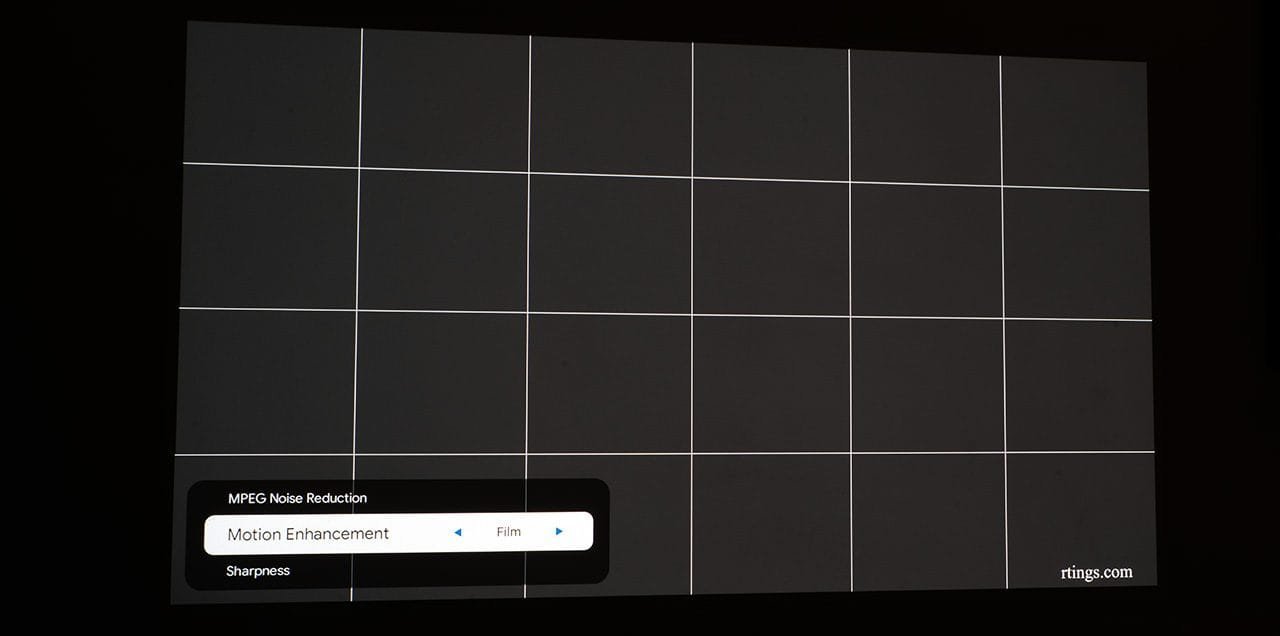
– Motion Enhancement: This important feature, often referred to as frame interpolation, adds extra frames to the original content. This reduces motion judder and enhances smoothness and clarity, particularly during fast-moving scenes. Here Valerion did an amazing job. The user can select between various adjust choices like:
- Off: Motion Enhancement is completely disabled, projecting the original frame rate on the screen. The downside is that 24p content is automatically converted to 60Hz using the well-known 3:2 pulldown method, which can cause unnatural motion in the content.
- Custom: In this mode, users can manually adjust the degree of Motion Enhancement intervention, specifically in two areas: Judder reduction and Motion blur reduction. This allows for precise control over the Motion Enhancement function .

- Film: The Plus 2 reproduces and projects 24p and 48p content without any internal conversion, offering viewers the authentic Hollywood film experience.
- Clear: This setting strikes a balance between smoothness and the original cinematic feel. It’s ideal for those who dislike the blurriness of a native 24-frame film but also want to avoid the “soap opera effect” caused by excessive frame interpolation.
- Standard: This mode delivers a clean and smooth playback of 24p films, simulating the look of original 60Hz content without overly aggressive smoothing.
- Smooth: The highest level of intervention from the Motion Enhancement algorithm (up to 60 frames), offering the smoothest possible playback. Frame rates are increased, and clarity during fast scenes is maximized. However, artifacts may occur, especially in fast-moving scenes with complex vertical or horizontal patterns.
The last but quite also important menu tab and one of my favorites, is the Calibration Settings. Oh boy, this is where the Valerion engineers have given us the best “tools” available today for RGB laser projectors, allowing for precise image calibration.

– Color Tuner: Here we can adjust the three basic color parameters (Hue, Saturation and Brightness) for each on of the primary (red, blue, green) and secondary (yellow, cyan, magenta) colors. Also there is the useful option for skin color adjust, like the AWOL Vision projectors, cool!

– White Balance: Here, we can fine-tune the entire grayscale temperature. Valerion provides two options: a quick 2-point adjustment and a more detailed 20-point adjustment for precise calibration.

– 2 point: This is the classic white balance setting found in most projectors on the market. Here, we can adjust the Gain, which affects the entire grayscale, and the Offset, which specifically affects the lower IRE levels of the grayscale.
– 20 point: Ηere we can fine-tune the three primary colors that make up the entire grayscale (their percentages change depending on the grayscale level up to 100% white) in increments of 5 IRE, meaning individual adjustments every 5% of the grayscale. As you can imagine, this is the ultimate tool for achieving perfect white balance and an ideal gamma curve. By adjusting all three colors together, you can change the brightness of a specific shade of gray, effectively modifying the gamma curve as well (for those who might not be familiar with gamma adjustments through white balance setting).

– Gamma Calibration: Although gamma can be adjusted via the white balance settings, as mentioned earlier, Valerion also offers a dedicated gamma adjustment control that allows us to change the brightness of the grayscale in 5% increments adjusting the gamma curve. Simply put, a complete detailed calibration suite by Valerion, well done.

A nice touch that shows Valerion appreciates and invests heavily in A.I. technology is the dedicated button on the remote, which leads us to a very nice three-dimensional graphic with all the A.I. tools gathered and available, including quick access to ChatGPT.


Measurements
Contrast
On/off native contrast : 2.940:1
On/off contrast with Black Enchanced on : 12.800:1
These are the measurements using a full black and white pattern. If instead of a completely black frame, we use a pattern that contains a few white pixels, then the black level rises and the contrast becomes approximately 1.560:1. This means that the Plus 2 has some sort of built-in ‘EBL’ which cannot be turned off. I reached out to Valerion for clarification on the native on/off contrast, and they confirmed that while the native contrast of the Plus 2 is 3.000:1, the native optical contrast is exactly half at 1.500:1. The official specs for the Plus 2 will soon be updated to reflect the native optical contrast as well.
Brightness
You know, I could provide a full chart showing brightness across all modes and settings, but what’s the point? Sure, it might look impressive, but is it really useful? If I told you for example that the Plus 2 can hit 1900 lumens in Sports Mode with brightness enhancement on, would that really help? Are you going to watch a movie or sports with an image that has a green and blue tint due to the lasers being pushed to their limits? Probably not.
Instead of overwhelming you with data, here’s what truly matters—the real brightness of the Plus 2:
– 1540 lumens, calibrated in Cinema Mode with luminance power set to 10 and Black Enhancement enabled.
– 810 lumens, calibrated in Cinema Mode with luminance power set to 0 and Black Enhancement disabled.
Color
Here, I conducted three measurements. The Plus 2 gives us the ability, in addition to automatically selecting the color standard depending on the content it displays, to manually choose between REC.709, DCI-P3, and BT.2020. The measurements were taken exactly as it came out of the box, without any adjustments.
REC.709

DCI-P3

BT.2020
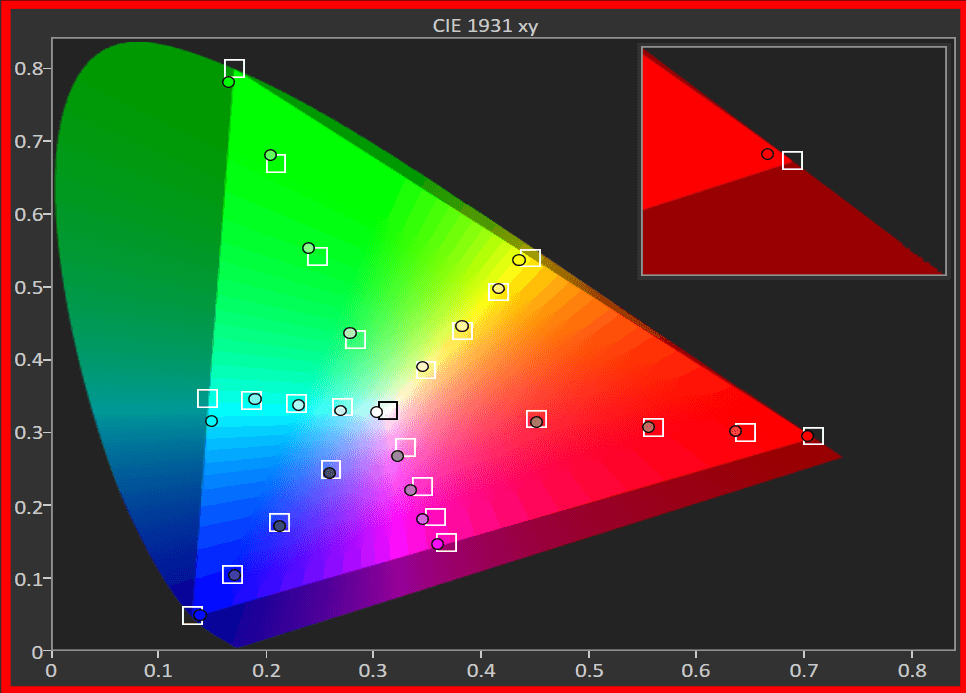
Personally, I have never seen any projector in any category or price range that comes better factory-calibrated in terms of colors than the VisionMaster Plus 2. Its accuracy in color saturation, hues, and brightness is unreal, and it’s impressive that it maintains this color accuracy across all three color standards. Well done, Valerion. It’s a shame, though, because as you read above the Plus 2 has a full CMS adjustment system, which literally becomes a decorative feature.
Grayscale temperature & gamma
I did a lot of measurements with the Plus 2. I even spent a whole day to truly understanding its behavior in all the picture modes. Of course, I won’t bore you with too many diagrams and endless measurements, that’s absolutely pointless. I will share with you my experiences and the measurements I think are important so that you can understand its behavior too.
The different picture modes don’t work magically, each one simply has different factory settings for parameters such as luminosity, gamma, etc., settings that we as users can also change. So I chose Cinema mode (I like the name) to set the Plus 2. Also, I always had Enhanced Black turned on, as I found that first it does not affect the grayscale at all, and second I consider its activation essential anyway.
Cinema mode

Cinema mode calibrated

The white balance and gamma controls work in an exemplary and linear way, and you can easily achieve the perfect result. The ability to adjust every 5% of the gray scale produce a magical result and I won’t hide the fact that I was tempted and measured every 1% to see what’s going on between the 5% (i had bad experience in the past with this 5% white balance adjustment setting), and I was really impressed. Not even a specialized external scaler works so flawlessly in the detailed adjustment of grayscale and gamma. Seriously, Valerion?
Brightness, Lens & Sharpness
First of all, the Plus 2 is bright—seriously bright. The 1540 calibrated lumens might sound like a small amount of light to some of you, but it’s not! Consider this: a beast like the AWOL Vision LTV-3500pro with its 3500 lumens is a light cannon when projecting onto a 120″ CLR screen, right? Absolutely. But keep in mind that the CLR fabric has a gain of around 0.5, which means the ultra-bright image you’re seeing is actually about half of those 3500 lumens.
Next to my 32′ & 34′ monitors (both on night mode as i use them)

Now imagine that kind of impressive brightness coming from a small cube-like projector. When you first see it in action, it’s almost funny, you’re left trying to believe what you’re seeing.
I’m really curious about its bigger brothers, the Pro 2 and the MAX, which are rated at 3,000 lumens. If the Plus 2 is already this bright, what on earth am I going to experience with them?
The Plus 2 in this screenshot not only projected at a screen with 0.6 gain (Celexon dynamic slate ALR screen) , but with digital image correction too! These are 100 inches. Raw image from Sony A7cii with 35mm f1.8 lens highly compressed to jpeg.

This RGB laser engine, I’m not even sure it was made on this planet. Its performance is otherworldly. How is it possible to generate that much light, produce such a wide color spectrum, and yet not produce significant heat and all these at such a small package? Even at full power, the Plus 2 generates minimal heat, and sometimes the cooling fans stop completely because they aren’t even needed!
The second thing that really stands out is the lens. The focus and clarity of the image, from edge to edge, is absolutely perfect. And it’s not just the lens—it’s the entire optical system. The 4K resolution produced by the XPR module is so sharp, it almost looks native on the screen. If you look closely you can see the pixels of the 4K image.
Even as I write this, I can’t believe, not the performance of the Plus 2 optical engine, but its price! Lenses with this kind of performance we meet usually at high end models and not at this price range projectors.
Color performance
One of the undeniable benefits of a pure RGB laser engine is its outstanding color performance. Until now, I couldn’t have imagined a projector that would challenge my AWOL Vision in this area, but here we are. The Plus 2’s color performance is absolutely on par with my AWOL Vision, and in some aspects, it might even surpass it. It’s not just about the Plus 2 ability to cover the massive BT.2020 color space, it’s about the natural, warm, cinema-like feeling you get as a viewer. As I’ve said before, specs and measurements don’t always tell the whole story.
Screenshot on a white wall

The perfect white balance and the Plus 2 ability to control all the intermediate shades of gray so precisely (means the perfect gamma curve) make all the difference here. The image feels perfectly balanced and truly pops off the screen.
It’s like watching reality, not just a projection screen.


We have full control over the color intensity of our image with the Plus 2, as it allows us to switch between Rec.709, DCI-P3, and BT.2020 color gamut at any time.
Below are some sample shots I captured to give you a sense of the differences between these color spaces (of course my camera couldn’t capture the 110% coverage that the Plus 2 can produce on BT.2020 color space but you’ll get the idea).
REC.709
DCI-P3

BT.2020
I’m going to devote an entire paragraph in this section just for animated movies, which I’m a big fan of. I know you’ve probably watched them on various devices like OLED TVs, other high-end laser projectors, etc. Stunning colors, razor-sharp images and vivid colors — yes, I know. But I want to talk about something else.
When I played various Pixar and Disney movies on the Plus 2, I really enjoyed what I saw, but I couldn’t put my finger on why. And no, I’m not talking about the excellent sharpness, contrast or colors. After several tests and hours of viewing, I finally got it. It’s the cinematic quality of this little projector that stands out. It makes you feel like you’re watching the movies in a movie theater. You know, you have this “i am in the movie” feeling.
English isn’t my native language, so I’m not sure if I expressed myself clearly enough for you to understand what I mean, so i will add some screenshots and hope it will help somehow.


Contrast and black level
With a native contrast ratio of 3,000:1, the Plus 2 is already one of the top performers in the DLP category. Its image offers high contrast and a respectable black level, ensuring a pleasant viewing experience for all types of content, even during the darkest scenes of a movie.
What sets the Plus 2 apart, however, is a game-changing feature: The Enhanced Black Level (EBL). EBL is activated via the “Laser Luminance” menu and increases the contrast ratio to over 10.000:1, resulting in deeper blacks and expand seriously the dynamic range of the projected image.
How does it work? EBL (Enhanced Black Level) is an advanced algorithm that dynamically controls the laser power and various image parameters adjusting them scene by scene in real time. If the Average Picture Level (APL) is too low, the EBL algorithm kicks in and reduce the power of the laser engine while fine-tuning other image settings such as gamma, brightness and contrast.
The result is impressive: the blacks become deeper without sacrificing any detail in the highlights, quite the opposite, as they are actually enhanced. Simultaneously, the gamma curve is adjusted making the scene appear brighter with richer blacks without loosing details in dark and bright areas. This is pure magic.
This not fair for the EBL, i mean present it through high compresses images, but you’ll get the idea.
EBL off

EBL on

EBL off

EBL on

EBL is a core feature of all AWOL Vision Laser TV projectors, but Valerion has taken it one step further.
The remarkable thing about the EBL is how subtle its operation is, you won’t even notice it no matter how hard you try. While you’re watching a dark scene, the algorithm makes all these adjustments in the background and unlike other solutions, such as dynamic iris, the EBL operates so seamlessly that it never distracts or causes any visible side effects.
You’ll only see the intended effect, which is exactly this…


In my engineering sample unit, the EBL currently works only at full laser power. Even if you’ve previously lowered the Laser Luminance Level to 0, once you activate the EBL, the brightness instantly ramps up to maximum, although this change isn’t reflected in the Laser Luminance Level setting, which remains at 0.
I expect this to be addressed in the final firmware, as many users—myself included—have smaller screens, up to 100 inches, and would prefer to lower the brightness without losing access to this impressive feature and the outstanding contrast improve that comes with it.
As a general conclusion on the contrast of the Plus 2, I can say this: The Valerion VisonMaster Plus 2 it’s the first DLP projector in the 28 years they have been on the market, where I can say with certainty that can produce an image where the blacks aren’t gray, are blacks, and the familiar DLP “haze” in high contrast scenes does not exist. It’s as simple as that.
Here is a video demonstrating this magic Valerion EBL function ( I am sorry for the bad youtube compression).

Update
The EBL can now be used across all laser power levels and offers two settings instead of the previous on/off functionality: High and Low. Unfortunately, this new beta firmware is causing brightness pumping and color shifting at random moments, even in bright scenes where the EBL is not supposed to have much to do. I hope this issue will be resolved in a future firmware upgrade, as for now, it renders the EBL function practically useless.
In the video below, you’ll see the EBL in action. In the specific movies shown, no issues are present.

4Κ – HDR – Dolby Vision
With the biggest drawback of DLP projectors (low contrast) no longer an issue and equipped with a powerful RGB optical laser engine, the Plus 2 is a home theater projector you just can’t get enough of. Whether you’re watching a simple Youtube 4K video on your screen…

or a 4K blockbuster movie on the wall, the Plus 2 performance never fails to impress.

When it comes to HDR content, I prefer the HDR Cinema mode as it already has Enhanced Black enabled and Warm 1 selected for the white temperature. However, the real highlight of the Plus 2 is its Dynamic Tone Mapping function, which works really well. You only realize how important it is when you switch it off. When Dynamic Tone Mapping is on, everything looks much better, highlights show more detail, midtones gain contrast and dark areas have a much better gamma. It’s difficult to fully capture this improvement with my camera, but I can’t leave you without a sneak peek, here’s a screenshot.

I watched again my favorite Top Gun Maverick in HDR version which i know every scene so well and i was really impressed by the Plus 2 behavior in difficult scenes. The skin tones are natural and the EOTF ST2084 gamma is adjusted so well by Valerion.


On the other hand, Dolby Vision is in a class of its own. In my opinion, it’s the best high-dynamic-range format for 4K movie playback. The Plus 2 is officially Dolby Vision certified, and its performance lives up to expectations, it’s simply outstanding. It has the same pedigree as the AWOL Vision, and both deliver one of the best Dolby Vision experiences on the market.
I prefer the Dolby Vision Custom mode with Laser Luminance Level at 10, warm 2 for the white temperature, Enhanced Black on, Active contrast low, Smooth Gradient low and Motion Enhancement in film position.
This is something not easy to describe, you have to experience it for yourself. The Hollywood not at your home, but at your wall, as the screenshots below captured..


The Plus 2 is packed with so many features to enhance the image that I could easily speak (basically writing) for hours and still miss a few. From Dark Detail and Active Contrast to Super Resolution and Smooth Gradient, and much more ensure that with the Plus 2, you’ll never run out of options to experiment with, and you’ll certainly never get bored. All of them you can use them with HDR or Dolby Vision content of course.
One important detail to remember: make sure to specify the size of your screen so the Plus 2 can optimize its image parameters accordingly, especially for Dolby Vision content and also help the auto screen feet tool. You’ll find this option under the ‘Display & Sound’ section.


24p film & Motion Enhancement
I’ve already covered the details of Motion Enhancement and its modes in the menu section, but here I want to focus on Film Mode and the importance of 24Hz.
Most 4K HDR and 1080p movies are filmed at 24 frames per second (24p). To accurately reproduce this content, a display device needs to support a refresh rate of 24Hz. The challenge is that DLP technology typically can’t handle frame rates below 60Hz—even my computer monitor lacks the ability to display 24Hz natively.
Valerion, however, utilizes a special technology and algorithm that allow the DMD chip to handle 24Hz content without any frame conversion. My guess is that the Plus 2 achieves this by multiplying the 24Hz signal to 96Hz (4x), allowing it to properly sync with the XPR module, which generates the 4K resolution.
To use this function, you must select the ‘Film’ in the Motion Enhancement setting. I’ve spent hours watching 24p content on the Plus 2 and the motion at 24p is exactly as it should be, smooth and authentic. If you want to verify that a display device can reproduce 24hz without any conversion, there’s an easy way, just go to YouTube and use a camera (even a smartphone) where you can manually set the exposure time to 1 second.
The video you should search is something like that

It’s simple: the image contains 24 black boxes, and a white box moves across them at a rate of 24 per second. Within the same second, each black box turns white for exactly 1/24th of a second. If you take a photo of the screen with a 1-second exposure, and your display device is running 24Hz smoothly, all the black boxes in the photo should appear in the exact same shade of gray. If not, then there is a judder or some kind of conversion.
Here is the Plus 2 playing 24hz with the Motion Enhancement off

And here with the Motion Enhancement at film projecting the exactly same 24p pattern.
The Plus 2 can handle both 24 and 48 frames per second flawlessly (I assume the 48 frames per second is converted internally to 192 Hz). Just remember that you need to enable Motion Enhancement for this feature to work properly.
Gaming
As many of you probably know, I am a passionate gamer. So I thought I’d take this opportunity to show you my gaming setup. This is my modern gaming corner with a PS5, an Xbox Series X, a Nintendo Switch, a gaming PC and a Raspberry Pi 400 loaded with emulators on a 1GB SD card. All consoles are connected to a 32-inch 4K Dell monitor, while the gaming PC is hooked up to an ultra-wide 34-inch Gigabyte monitor. For sound, I use a BOSE SoundDock to which I connect my iPod to listen my music when I’m not playing.

In the other corner is my retro setup. A Commodore 1084s CRT monitor is connected to an Amiga 600, a PS1, a Sega Mega Drive 2 and a Super Nintendo, all wired via an automatic SCART hub and equipped with wireless controllers.

As you can imagine, a projector’s ability to handle gaming is a crucial factor for me when it comes to integrating it into my space. For my testing with the Plus 2, I used the Xbox Series X to play my favorite game, Dead Space Remaster, which I’m currently trying to finish it for the second time (what a gem!).
First, I checked that the 2.1 HDMI is working as it should. You will need a 2.1 HDMI cable, don’t be like me, spending half an hour fighting with settings, only to realize I had connected the Xbox with a 2.0 cable. Be smarter than me.

There are quite a few settings here as well , covering both HDMI options and gaming itself.

Sometimes you need to select manually the Enhanced Format in order to use the 2.1 protocol, “Auto” does the job, but not always.

Lastly, you can navigate to the Game Settings, where you’ll find plenty of useful features to explore. I told you, the Valerion engineer who created this menu is a true projector junkie (and a gamer perhaps).

Valerion claims that the HDMI 2.1 ports on the Plus 2 have a delay of only 4ms at 1080p and 15ms at 4K, and I’d say they’re not lying.
I can’t and don’t care to measure it, this is purely based on visual experience, a gamer always knows.
There’s absolutely no lag, even at 4K60 gaming. I played the Dead Space remake (which I’ve already finished once) for more than 5 hours straight, and I couldn’t feel any difference in response compared to my 4ms DELL monitor. If Valerion is telling the truth about the 15ms input lag at 4K, then my DELL monitor definitely has more than 4ms lag because I couldn’t detect any difference between the two.
The user experience in games like MudRunner or SnowRunner is incredibly immersive. Navigating through rugged landscapes feels so realistic, it’s almost like you’re actually behind the wheel battling the terrain yourself.

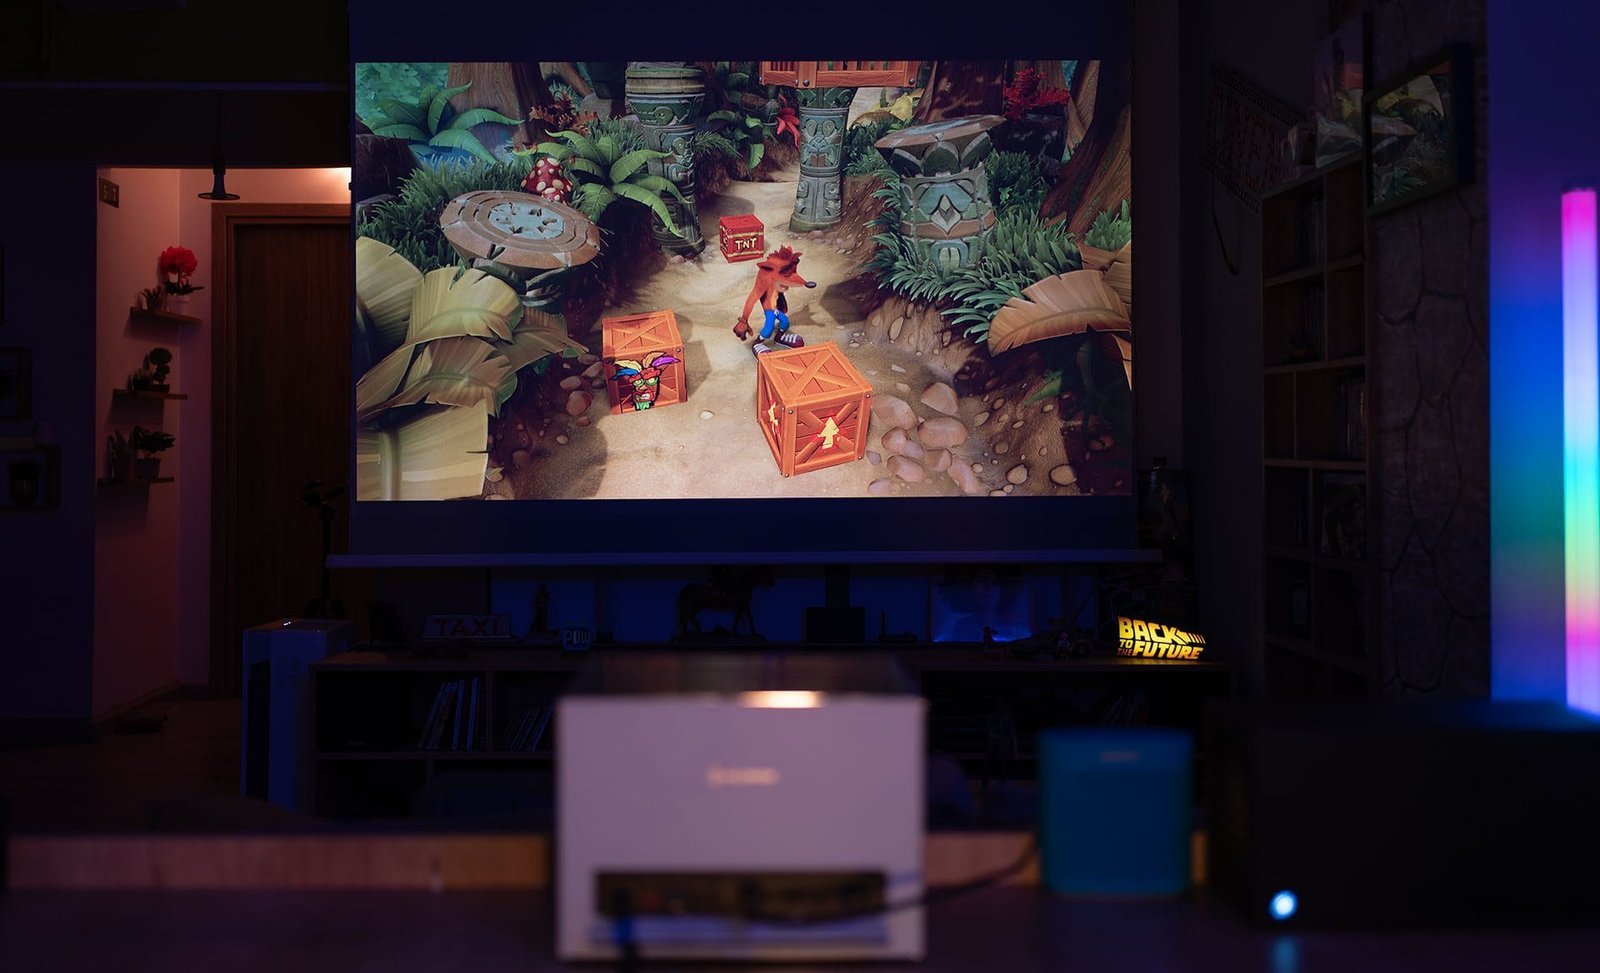
Playing Crash Bandicoot in 4K Dolby Vision at 100′ it’s cool, sooooooooo cool!
The Plus 2 is a true gaming projector that supports 4K 144Hz input and ALLM (but not VRR) with one of the best input lags on the market. Anyone with enough space to project a 130- or even 150-inch screen will experience true gaming with one of the best images today’s technology can offer.
Sound
The Plus 2 features a built-in sound system consisting of two 12W drivers with DTS capabilities. There is a separate section for sound that you can find in the quick menu.

Inside the main Sound menu you can find everything you may or may not need. You can choose one of the factory sound effects that suits to your ears and space, enable the Virtual DTS and so much more.

The sound of the Plus 2 is very well tuned. Everything is in balance, and you feel like you don’t want to experiment or change anything. Incredible quality for such a small projector—bass, mids, and treble are all perfectly adjusted for my taste. The fact that the sound comes out from both the left and right sides of the projector, rather than directly into your ears, creates an amazing diffusion effect that makes you feel like you’re at the center of the action in the movie you’re watching.
Here, you can perform an Auto Acoustic Tuning. The Plus 2 uses its built-in microphones to run a sound test and automatically adjusts the audio parameters to suit your space. There’s also a Wall Mount Setup option if you place the Plus 2 close to a wall, unreal..

If nothing suits you, don’t give up, Valerion provides all the tools you need to manually adjust the sound performance exactly to your personal taste.

I’m truly amazed that although Valerion have obviously put a lot of time and effort into the Plus 2’s image performance, they haven’t compromised on sound. The Plus 2 can easily be used as the only audio device in your AV system, and not only that, you can also use it as a standalone Bluetooth speaker. I connected it to my iPhone listening spotify and i was really amazed with its performance.
The audio delay setting is also present on the Plus 2. We’re talking about one of the most comprehensive audio menus I’ve ever seen in a projector.

Valerion really nailed it by even adding an HDMI Audio Device Guide with a diagram for eARC functionality, so you can make the necessary connections without even needing to Google anything if something isn’t clear for you. I don’t know about you, but personally I appreciate such details because they show me the quality of a brand.
Another detail that i have to mention is that Valerion is part of WiSA. What is WiSA?

WiSA (Wireless Speaker and Audio Association) is a standard designed to simplify the installation of high-quality, wireless multi-channel audio systems. It allows up to eight channels of uncompressed, hi-res audio with very low latency and is therefore suitable for home theater, gaming and music systems. WiSA-certified products are designed to work together seamlessly, reducing the need for speaker cables and maintaining audio quality, although each speaker still requires a power source.
You can find a certified speaker set of the desired brand on the WiSA website and easily put together your personal wireless multi-channel audio system around your Plus 2 without having to deal with cables and complicated sound settings. Well done again Valerion!
#tip, choose the sound mode “theater” and you’ll thank me later.

To summarize, the buyers of the Plus 2 should be prepared for the pleasant surprise they’ll experience with its sound, otherwise they won’t know what hit them.
The Random Fact of the Day
I just wanted to share a photo with you. It was taken with an iPhone 15 Pro Max, and I wanted to express my surprise at how far smartphone cameras have come these days. The photo you see is exactly as the iPhone took it (although quite compressed and with lower resolution for the net), and I have to admit that even in these difficult lighting conditions (a super bright image from a projector in a semi-dark room), it rivals my full-frame camera.
Just as with projectors, the latest example of which is the Valerion VisionMaster, we also see a spectacular development of technology in other areas such as photography, which never ceases to amaze us. I’m glad I could share this with you.

The Random Feature of the Day
After the random fact, I’m also introducing a new section in my reviews from today, called “Random Feature of the Day.” And who is better to kick it off than the projector featured in this review! I am full of surprises, yep, i know..
A mysterious on/off switch, a series of LEDs, and two microphones are located on the top of the Valerion VisionMaster Plus 2.

By activating this switch, the well-known “Hey Google” assistant remains always on, allowing you to use it hands-free, even from across the room, without needing a remote or pressing a button. It works as expected, letting you issue commands like “search YouTube for a moussaka recipe,” “turn up the volume,” or even “turn off the projector” while you cooking at your kitchen or relaxing on the couch. The convenience of controlling your device without touching anything is truly enjoyable! Come on Valerion! Stop it!
#tip, you have to enable the Hands-Free Mic function inside the Google Assistant.

What I didn’t like about the Plus 2 or what I’d like to see improved
I chose not to mention any negatives in the individual sections of this review so that I could gather them all into one section, making it easier for you.
– Netflix App: The Netflix app doesn’t work. While I can log into my account and access the menu, I get an error message when I try to play a movie. According to the information I received from Valerion, this issue will be resolved in the final product (I tested a pre-production unit). I have no reason to doubt them, but I felt it necessary to mention.
– Cooling System: I believe the cooling system needs improvement, not in terms of heat dissipation—the Plus 2 doesn’t get too hot—but in how it operates. I would prefer if the cooling fans ran continuously with an inverter controller, adjusting their speed as needed, instead of stopping completely and restarting when deemed necessary.
– 3D Projection: The 3D projection feature is not functional on my device. However, I have been informed that it will work just fine in the production models.
– Laser Speckle: The Plus 2 is not entirely free from laser speckle. This effect is particularly visible on ALR screens. For those unfamiliar with speckle, it appears as multicolored noise in bright areas, such as the sky or on black backgrounds, generally on large monochromatic surfaces. This phenomenon occurs with all RGB laser projectors, but in the Plus 2, it is extremely limited and in no way disrupts the viewing experience. However, I felt it necessary to mention it.
– Menu Bug: There are some menu sections that pressing the back button on the remote doesn’t take you one step back as it should, the “projector” menu section to be more specific. Instead, it closes the entire menu, which disrupts navigation.
– Super Enhanced HDMI Mode : I couldn’t enable the 240Hz function no matter how hard I tried, it was always disabled. I’m not sure if something from my PC or the cable I used was the issue, but I wanted to mention it.
– HDMI handshake issue : When you return from the main “projector” menu to the home screen, there’s a brief HDMI handshake issue with a black screen appearing momentarily. I hope this is resolved in the production models with a firmware upgrade.
– Weight: I wish the 7kg could be less. It’s not really a problem, but I would have preferred the Plus 2 to weigh around 2-3kg less. Its size is somewhat disproportionate to its weigh, that’s what I mean.
As always, I couldn’t leave you without a video so you can get an idea of the Plus 2’s performance. All the footage you’ll see has not been edited in any way, it’s straight out of the camera. Equipment used: Sony a7cii camera and DJI Mic 2 microphones.

Conclusion
This is the first time that the conclusion of one of my reviews will be so brief. The projector I introduced to you in this article is currently available for purchase on Valerion’s website (https://www.valerion.com/) via Kickstarter for $1499. Yep, you read that right, $1499. I think I’m done here.
Update, you can buy your Plus 2 now from Amazon, here is the link https://amzn.to/4i9EjJW
Nikos Tsolas
84 Comments
What is the contrast after calibration? Would be nice to compare it with Hisense C2 Ultra
All the contrast numbers on this review are after calibration!Yep, it would be nice to test the C2 ultra and compare it with the Valerion series, but Hisense does not seems to trust me enough and send me a demo unit for a real test by an independent tester like me.
Regarding the fan, can you switch on high altitude mode and let the fan run without stopping? With low noise, I don’t mind it constantly running to keep the DLP chip cool as much as possible as there’s been report of DLP chip failure in LTV-3500 units suspected due to heat as it’s not rated for such high lumens.
sure you can!But Plus 2 doesn’t get so hot even with the fans stopped.
What is the purpose of the Black Level setting if it doesn’t decrease the brightness?
it does decrease the brightness, but only of the lower IRE, it doesn’t affect the whole image brightness like the classic brightness setting.
Great review! i Valerion had loaned you the Pro 2 instead.
i think i will test the Pro 2 also, i am very curious myself to see those 1000 lumens more brightness and the 15.000:1 contrast.
Hi Nikos, do you already have an idea when you will test the PRO 2?
Hello Projectorjunkies,
one important question for me: Didn´t you measure the ansi contrast / in picture contrast?
And the minimum black level in nits or ansi lumens? And how is the clarity near black (black crush)/ details in dark scenes near black? For me as a jvc dla user for many years this is important to know…
As a DILA owner too i can say only this, its time to upgrade. The Valerion is better on every aspect of the picture, can not match the JVC black level of course, but its closest than ever. Of course the ANSI contrast is much much bigger on Plus 2 compare not only to JVC but every LCD projector.
And the ansi / in picture contrast would be very interesting…
Hi, thanks for the review!
I’m confused about VRR, from the review:
“Plus 2 is compatible with 4K144Hz VRR (Variable Refresh Rate)”
“The Plus 2 is a true gaming projector that supports 4K 144Hz input and ALLM (but not VRR)”
Does it support VRR or not? 🙂
Thanks!
Sorry for my mistake. Plus 2 does not support VRR!
Hi Nikos, from the photos it looks like it can accept a 4K 120hz signal from Xbox or PS5. What happens in this case? the signal is downsampled to 60Hz and VRR is not enabled?
Yes i believe it does support VRR
Wow great work, thanks a lot! One question, It Is silent enough when the fun are running?
thank you, yes, it is absolutely silent!
Ok, thank you for clarifying.
Thank you for this amazing review. How would you say this projector compares contrast and black level wise with the NexiGo Aurora Pro you recently reviewed?
better contrast and colors for Plus 2, also less noise and heat. But the Aurora pro is playing nice, it’s a cinematic projector, no doubt about it. Choose by throw ratio, UST or 1.2 ratio.
Thank you very much for the answer Nikos. USTs actually don’t work in my room, that’s why I have been waiting so long for a regular throw DLP with great contrast just like the USTs have been doing for some time now. It’s so good to know that the Valerion has even better contrast than the Nexigo, since it is a reference. I will go with the Valerion Pro 2.
Thanks for your awesome review.
Please how do you find the brightness if projected directly on the wall with daylight ? Are the images sufficiently visibles ?
Also does it have a wall color adaptation function ?
Thanks again.
Thank you for this detailed review!
How do you imagine the plus 1 with 500 less lumen will hold up?
I never really had a projector and have difficulty understanding how much of a difference it makes?!
I just plan to use it in a dark room, probably at a maximum of 70 inches for the next 2 years.
Does it make a difference for 3D or HDR? Just feel that 300 euros more is quite a bit of money for me but if it’s worth it, I consider it.
Thank you 🙂
The Plus will hold just fine for screens 100-120′
I’m not Nikos, but let me say that this market is evolving so fast (finally, after years of almost nothing) that if you’re planning of projecting the next two years in a low light room on a 70” surface, the 1500 lumen Plus would be absolutely more then adequate… and you’ll save the money for a future upgrade when the limits will be pushed still further.
You’ll still be amazed at what 1500 lumen by a Nichia laser can project.
I’m considering a new setup and have full placement freedom. Would you opt for this or the max over the 3500 awol UST?
Oh I’d project a 170 inch size
There is quite a large error in the greyscale at 100% IRE. Did you try and calibrate that out?
i didn’t spend the time, but i will do it and i will update my review soon.
Brilliant, thank you 🙂
is AWOL or Valerion a sub company of any chinese brand projector? thanks for a great review.
Thank you for that amazing substantial and deep review! I really appreciate your style of writing and testing by combining objective measurements with subjective impressions and relating them to real-life significance. I ordered the Pro 2, and a few days ago I suddenly was scared if I was dumb ordering a projector that hasn’t been thoroughly tested. Now I’m sure it was a good buy!
Random fact of the review for you: One time you used an old greek “ι” for the “i” in “natιve”. How come? 😀
Hi Nikos, is there a calculator to check which Valerion is compatible with my viewing distance of approximately 4.00 meters? I think I have to choose between the pro 2 in December and the max in May.. what would you do. I currently have an optoma UHD35 which does its job very well in bright scenes, but is poor in dark scenes. What do you recommend between the 2?
from 4m the Plus 2 will open 4:1.2=3.33m wide screen. For Pro 2 that has the optical zoom the screen size will be from 2.6m up to 4.4m. But don’t forget that you can always use the digital zoom if you want the screen size to be smaller. Pro2/max are so close, just choose one, personally i would go with Pro2.
Thank you for the review and time spent!
I am still trying to understand
Let’s say I have a 100″ but want to use this from let’s say 4.3m will it not work, with this or the Pro 2 or Max that have optical zoom?
Also what screen gain would be recommended for this (and Pro 2 or Max)
Use the screen calculator at projectorscreens.com. Use it to enter in the diagonal size screen it it will return other dimensions of the screen. Once you have the width of the screen in inches, multiply it by the throw ratio of the projector. that will give you the distance required in inches. e.g calculate for a 100 inch screen using the Valerion Pro 2/Max which has a throw ratio of 0.9 to 1.5. According to projectorscreens.com the width of the screen in inches is 87.16. First multiply that by .9 which equals 78.44 inches or approx 2m. Then 87.16 x 1.5 = 130 inches or 3.22M. Your range for setting up your projector for an image of 100i nches in diagonal is from 2m to 3.22m
Is EBL crushing shadow detail? It looks like it in the photos. If not could you update the photos with proper exposure to show shadow detail? We surely do not want crushed details as a tradeoff of higher contrast.
Its difficult to capture the dynamic range of this projector, and almost impossible to show it with 150kb high compress images. No, the blacks are just fine with EBL on and perhaps even with better dark details.
Hi, thanks for the review. Have you noticed any rainbow effect? Usually seen when moving your eyes fast on images with bright parts and dark backgrounds… Thanks!
Yes, this! Please let us know.
no rainbow effect for me!
In the YT video, there appears to be a pink/gray line rolling along the video, especially noticeable with Crash Bandicoot. Is that an effect from your recording device and does that appear in actual use?
It’s just the camera sutter, these lines does not exist in reality.
Great article, thanks! I’ve just put down a kickstarter pledge for the Max model. How was the noise level of the fans of the Plus 2?
On Plus 2 the noise level is minimal, also does not produce heat.
Great review What is the DMD chip size? 0.47”?
Hi, thank you for this great review. I pledged for the Max, but currently considering whether to get a Hisense PX3 Pro instead. With UST I would be able to fit a 90in floor rising screen in my current setup vs a much larger one with the Valerion (throw distance ca 4.5m). What would you recommend?
The Hook Up tested black floors for the Hisense vs AWOL, with the latter having a fairly high level. Any values for the Valerion?
I currently have JVC RS540 with madVR for DTM. Would the Valerion VisionMaster Max be a step up from my current setup? Thanks!
The black levels on the RS540 are outstanding, while the Valerion can’t quite match up in that area. However, thanks to its Enhanced Black Level (EBL) feature, the Valerion still delivers respectable contrast, along with several key advantages: more brightness, sharper image, Dolby Vision support, and superior color performance (covering the BT.2020 gamut). Personally, I wouldn’t hesitate to switch to the Valerion.
Thank you. That was helpful.
Since this is a very bright projector, getting a low gain gray screen might help with the black level?
Your review here and comments on AVSforum convinced me to pull the trigger. Pledge submitted for the Max model. Long wait though. In the meantime, looking forward to your Pro2 review. Can’t wait!
Unless I’m mistaken, I don’t see references to the equipment you use, what probe are you using? (Otherwise congratulations for this great review 🙂 )
Thanks, i am using an i1 display pro profiled on i1pro spectro and a AEMC CA813 light meter.
Hi What a very thourough excellent review.
I have one question! It seems from your pictures that it only has a single screw thread in the middle on the bottom for a ceiling mount. I have also been reading as much as i can as i would be intersted in the Max to replace my old optomo.
It seems the screw thread is M6*8 which of course is thinner than an ordinary 1/4″ camera tripod thread. Which I would not have thought is adequate for a 7.5kg projector hanging off of it. nor for the weight nor to stop vibration etc. There doesn’t seem any other type of mounting holes nor saftety attachments.
Have you tried this upside down on your ceiling. Thanks Ian
Hi, would the AWOL Vision Cinematic+ ALR Motorized Floor Rising Acoustic Screen work with this projector even though its an UST screen? I planned on getting the AWOL 3000 pro with this screen and didnt want to have to get more than one screen. Thanks for your review. -Byron
Native contrast is the contrast within a single frame, and it sounds like best case native contrast is 1.560:1. It is simply lying to say that the native contrast is 3000:1 because that is the dynamic contrast with the “EBL” setting off. Valerion’s attempt to make a distinction between “native optical contrast” and “native contrast” is meaningless marketing BS.
You clearly know this because you wrote an entire article on the difference between on/off contrast and native/ANSI contrast. Why do you call 3000:1 the native contrast?
Maybe it is still a good projector but I need to know that I am not being misled.
The native on/off contrast represents the difference between a fully black frame and a fully white frame. For the Plus 2, the measured native contrast is 3000:1 under ideal conditions (pure black and white). However, when the average display luminance (ADL) is increased to just 0.50%, the contrast drops significantly to 1560:1. This indicates that the true native contrast is effectively 1560:1, not the initial 3000:1.
Nice and detailed review. How did you take pictures of your screen without having the red tint from the REC2020 gamut?
Superbly written review! I’m stuck in the UST world due to space limitations but I also believe that folks with an ALR screen with a .55 or so gain would not be able to use this projector as it would be way too dim. You’d have to replace your screen with at least a 1.0 gain, IMHO. I’d love to see some of the features/benefits in a UST projector – – especially EBL. Again, well done!
Can you ask Valerion if a longer throw version of the Max is coming in the future (eg closer to 2.2)? That plus horizontal lens shift and I’d ditch my Epson immediately!
How does this compare with something old like Epson tw9300/5040eb?
Hard to find Ansi contrast numbers to compare but I guess Epson has better contrast
The Plus 2 is faaaar better than epson. Brighter, wide color space, better sharpness, dolby vision, better ansi contrast and this EBL function that make the dark scenes pass even better than epson.
Thanks, looking to upgrade my 5040ub from 2016 with the VisionMaster Max, based on some reviews I’ve seen I am assuming this can compete with the current equivalent Epson model LS11000, really wish I could go entry level 4K laser JVC or Sony but can’t really justify $6K plus customs into my country so native 4k will have to keep waiting until next upgrade cycle
So an ALR screen with this projector would cause too much speckle? I was eyeing the Vivid Storm Obsidian Long Throw ALR screen. Would this projector likely look bad on that screen?
I tried my JMGO N1 Ultra on an ALR screen once and it was damn near unwatchable
Yes, you can not use ALR screens with these projectors. The best are the vividstorm fusion and the fresnel screens.
How well do you think the basic “Plus” model will perform. Its only 1500 lumens but it has all the technology that it’s big brothers have. I’d use it in a space that has some ambient light during the daytime after shading.
Do you see image quality differences between pro2 and plus2?
Not too much, except from the brightness.
Would the Valerion Pro 2/Max be an upgrade compared to the Hisense px3 in terms of contrast and black level?
yes, the EBL make all the difference here.
Hi, thanks for the valuable work you do for us enthusiasts. I read that regarding ALR screens they could cause vision problems, I would like to use it with the Wupro Cinema Level Black Cristal 100” screen which has these characteristics: 70% ALR, 1.0Gain, 160° viewing angle, 4K/8K, created specifically for long throw projectors. I would like to have your opinion on this. Thanks
nope, i suggest to avoid that screen with any RGB laser projector
Does the focus setting reset when the projector is turned off and back on? Curious because i bought a projector years ago (around ~1600 dollars) which forces me to refocus the image every time I turn it on.
No, valerion does not lose the focus adjustment when you turn off the projector.
Will this projector work well with the Vividstorm Fusion screen?
Great work! I signed up for the Plus 2 and after reading your review. I don’t have a screen at the moment, but I’ve been looking into the DayWalker 2 – Tab-Tension CineGrey 4D from Elite Screens, which (not really) fits my budget. Since I’ll be using it in my livingroom I figured I’ll be needing an ALR screen, even though I’ll be watching at night. Would you mind explain if such screen is a good choice or not? From what I understand your testing of the projector is done on a ALR screen, yet in the comments you do not recommend it?
Yeah weird that the conclusion is the laser speckle is very minimal and then in the comments they really recommend not using ALR.
The ALR screen amplifies the speckle phenomenon. On the Valerion projector, laser speckle is visible (albeit minimal), and some viewers might find it distracting on ALR.
I have a question of the feature that fits the picture to the screen size. I have a 100 inch screen which means the projector should be set at 8 feet 9 inches from the screen. Does this feature mean if I set it up at 11 feet it would shrink the picture to 100 inches. If it did how would that effect to number of pixels displayed.
Hi, As Visionmaster Plus-2 has eARC with HDMI 2.0, would I be able to return back dolby atmos mix from google tv app to my atmos enabled receiver ?
I was of the opinion that we would need HDMI 2.1 to handle this
I have the C2 Ultra and still wonder about the Valerion. The menu options are very similar, mostly the same. Here is a question: did you experiment with JUDDER:0 in the motion smoothing? I ask because the C2 Ultra does well with this setting no matter the frame rate. I have no idea what FILM and CUSTOM JUDDER:0 differences are but JUDDER:0 seems to result in even less noticeable smoothing.